Tag Archives: cooking

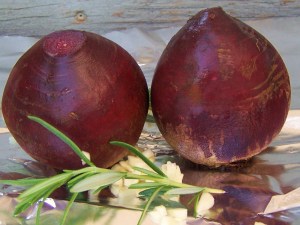
Rosemary Garlic Roasted Beets

5 Jul

I’ve been meaning to try roasted beets for aaaages, but Carl was dragging his feet as he sometimes does in the new-veggie department so I put it off and tried to convince him to put them in his smoothies instead, which also ended unsuccessfully.  I wasn’t willing to give up, though, because they are a seriously beautiful colour and for anyone who knows me, colour goes a long way with me.  

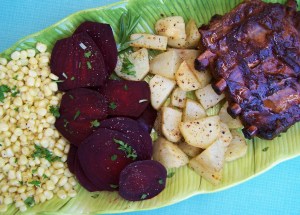
I made this dinner, which featured beets, a few nights ago, and it turns out beets don’t just turn your fingers, adjoining food and *ahem* *other things* magenta, they are surprisingly edible!

I was going to tell you all about it while watching a movie with Carl, being the multi-tasker that I am.  Did you know you can call it that now?  Not ADD, just multi-tasking.  I like it much better.

We ended up watching “127 Hours”, since Carl had read the book it’s based on and convinced me I would want to see the movie, but (SPOILER ALERT) trust me, there’s nothing like watching someone break their own arm and hack it off with a cheap utility knife to make you not feel like blogging about food.

Even writing that, I am considering not blogging about food.  Because with that mental picture you certainly don’t want to immediately look at and think about food, now do you?  It is a good movie though, don’t get me wrong.

Let’s just talk about something else first.

Let’s talk about the phenomena of renting movies on your TV.

This was actually the first time we did it, and it sure is frighteningly convenient isn’t it?  No debating who has to get off the couch to go to the movie store, either to get a movie or to return it.  No overdue fines.  The ability to watch the trailer first and determine which option has the handsomest actor with the best voice.  A slightly surprising TV bill at the end of the month.

I feel a little sorry for Blockbuster.

Are we ready to talk about beets again?

Oh, good!

They really are a beautiful veggie.

I grew up in a home where homegrown pickled beets were always found in abundance, but since I’ve yet to find anything I like pickled, it’s no surprise I wasn’t a fan of pickled beets.

Roasting vegetables, on the other hand, really never goes wrong, and beets, it turns out, are no exception.  Just make sure you give them lots of time so they’re nice and tender, or cut them into smaller cubes prior to roasting.  This way of preparing needs a good hour or more, but the beets come out infused with a rosemary and garlic flavour that is subtly delicious, and makes your house smell aMAZing.

Rosemary Garlic Roasted Beets 

(Serves 2)

2 beets

2 cloves garlic, 1 minced and 1 left whole

2 tbsp chopped fresh rosemary

1 tbsp olive oil

1/2 tsp each salt and pepper

2 tsp minced fresh parsley and/or rosemary (to garnish)

Directions:

Preheat oven to 425 degrees.  Cut beet tops to leave 1″ attached; leave tails.  Place on 10″ square of foil and sprinkle with rosemary, minced garlic and salt and pepper. Cut top off whole garlic clove and place beside beets.  Drizzle with oil. Fold to form closed packet.  Roast on rimmed baking sheet for 1-1 1/4 hours, until fork tender.

Remove from oven and, wearing gloves, peel and trim beets and cut into 1/4″ thick slices.  Arrange on warmed platter and drizzle with a bit more olive oil and sprinkle with parsley and/or rosemary to garnish.

Recipe adapted from Canadian Living.

…Eggplant is next up – I’ve bought them a couple times but I just spend many days admiring the gorgeous exterior royalty of it all, and never want to actually cook the beautiful things!

Meatball Slubs

7 Jun

I wasn’t sure what to call these, since in my mind they had to be called “slubs” but I realize that doesn’t really sound too appetizing.  But that’s just what they are – slider hot dog buns filled with meatballs = slider subs = slubs.

Amiright?

Superstore started selling these eensy top-split hot dog buns, presumably to complement their eensy slider hamburger buns, and since hot dogs are one food I generally won’t touch I had to think of something else to do with the cute li’l fellas, especially when I spotted a bag on the 50% off stand just asking to enter my buggy.

I love cute little food things, with the exception of the mini-corns in Chinese food, since I’m never quite confident that they are actually intended for eating and not just decorative filler, like straw in a gift basket of foodstuffs.  

These are right up Carl’s food-alley:  toast the buns in the oven for 5 minutes to eliminate sogginess, stuff in 2-3 small meatballs, top with tomato sauce and cheese (I’m addicted to Monterey Jack) and toss ’em back in the oven for 5 more minutes.

Once I got started I figured I might as well make the whole bag, so I could test if leftovers were reheatable in the oven, but I never got to find out – between the 2 1/2 of us we ate the whole dozen.  A side salad would’ve been nice too if I wasn’t making a whole bag of buns.

So easy, so delicious, and a great way to use my herb garden by making a sauce chock full of fresh basil and oregano!  

Creamy Chicken Taquitos

31 May

I love finding recipes that are easy and delicious enough to be make-againable.  This is definitely one that will be joining my regular rotation and probably becoming one of my go-to recipes when I need to bring someone a freezer meal!  The recipe doubles easily, and you can cook the taquitos from frozen in about 25 minutes.  They taste just like those taquitos you buy in a box for $10 or something equally ridiculous, and these don’t have your entire day’s sodium content in two little rolls.

After making them, a couple people randomly mentioned they had made the same thing that week so I clearly wasn’t the only one who thought these looked good!

I’ve made these a couple times now and the filling ingredients are super flexible, another feature of a great recipe for those of us whose grocery list is sometimes less than perfectly planned.  Adjust the spices to your taste and the number of kids eating with you – Gemma is not a fan of spice so I take out some of the mixture before throwing in the jalapeno and chili powder.

Also, I liked them with regular cream cheese but Carl and my mother-in-law are strongly anti-cream cheese so when I made this for them I substituted a combination of vegetable cream cheese spread and ranch dressing (this blog makes me give away all my secrets, after swearing to them both there was no cream cheese present 😉 ).  I have found in general that the flavoured cream cheese spreads, especially vegetable or herb and garlic flavour, give the same creaminess I’m looking for but don’t have that distinct “cream cheese” taste and they have saved me many a time.  Just don’t try this trick on your next cheesecake.

And make sure you line your baking sheet with foil or parchment paper since there is cheesy spillage and that stuff is a you-know-what to clean off.

CREAMY CHICKEN TAQUITOS

3 oz cream cheese, softened (or substitute Ranch dressing)

1/4 cup salsa

1 tbsp fresh lemon or lime juice

1 tsp chili powder

1/2 tsp cumin (this is what really makes them taste like the store-bought taquitos!)

1/2 tsp onion powder

2 cloves garlic, minced or finely grated

3 tbsp chopped parsley

2 green onions, chopped

1 jalapeno, seeded and chopped

1/2 cup chopped red or yellow pepper

2 cups cooked chicken, shredded or finely diced

1 1/2 cups shredded cheddar or Monterey Jack cheese

12 6″ flour tortillas

Cooking spray

DIRECTIONS:

Preheat oven to 425.

In large bowl, combine all ingredients except tortillas and cooking spray, mixing until very well combined.          Microwave tortillas for 20 seconds to make rolling easier, then spoon 2 heaping tablespoons of filling down the middle  of each tortilla.  Roll tortillas up tightly and place seam-side down on a foil-lined baking sheet.  Spray the tops lightly with cooking spray (this helps them brown and crisp).  At this point, you could freeze the taquitos and cook from frozen another day, or bake for 15-20 minutes until crisp and golden brown.  Serve with sour cream.

Recipe adapted from Annie’s Eats.

Freshness!

29 Apr

I don’t know why I didn’t do this sooner.

After spending close to a month at my parents’ house last summer before moving back to BC, I got kind of used to having fresh herbs in my food.  My mom has a flourishing herb garden and threw them in all our dinners with wild, delicious abandon.

I have always been intimidated by the idea of gardening, being the kind of person who can’t keep a cactus alive, but I finally decided to face my fears and risk the wrath of strata by drilling a couple holes into the side of our house and attaching a cedar herb planter.  Better to ask forgiveness than permisson, I always say (except to my kids).

I had told Carl a couple times that I wanted to do this, and he insisted he would build me a planter box as it was a silly thing to spend money on.  I raised an eyebrow or two but agreed that I would wait if he would actually do it.  He didn’t for awhile so I started to threaten very costly alternatives.

All of a sudden he got inspired after work one day.

His parents had some spare cedar siding around which he shaped into a beautiful box with holes in the bottom for proper drainage.  Then it was off to Home Depot for soil and gardening tools.  I requested gloves but the resulting laughter informed me I should simply add soap to my grocery list.

While he was picking up supplies he saw herbs and, not knowing exactly what I wanted, decided he couldn’t possibly go wrong with EVERY option.  He didn’t realize the spacing requirements for herbs.

So, into the planter box went rosemary, thyme, oregano and chives.

Into separate planters went parsley and mint.

Waiting inside for hotter days and warmer nights is basil.

I love how herb plants smell SO STRONG of herbs, and the fresh flavour is to-die-for.  It takes more fresh herbs than dried herbs to get the same amount of flavour but the smell and bright green colour is AMAZING.  We bought plants instead of seeds because we are impatient, and I can’t wait to watch them grow!  I’ve already used them in soup, quesadillas, pasta, and veggies…I’m sure they will be turning up in everything you can imagine over the next months.

There are times when having no screens is a great thing – I can open my living room window, reach out and grab my herbs!  And Gemma loves the idea that they will grow and then GO IN OUR FOOD and is constantly telling Carl this exciting fact, so hopefully that translates into actually eating them and not picking out the “green bits”.

If they do well I hope to freeze some and see if it works as well as the internets tell me it does.  Maybe some homemade pesto with that basil?  Homemade tomato sauces with that basil and oregano?  I think I am most excited about the oregano, since I LOVE pastas and lasagnas and omelettes and pizza and so many other things with a little or a lot of oregano, and if I don’t have anything to put it in I can just spend my days smelling it.  Chives are a close second though…yum.  And having parsley handy for recipes and garnishing things…ok, I’m excited about them all.

You don’t need much space or light or gardening skill for this, so pick a couple favourite herbs and plant away!  Even just so you can smell them!

Happy (Easter) Cookies

21 Apr

Easter weekend!  

Easter is my favourite holiday, both for the Christian background and the totally unrelated candy choices.  Although, eggs = hatching = new life…so there is some logic I suppose?

Sadly, this Easter Carl will be out of town so I needed something to cheer me up (besides the eggs and Mr. Munchy bunny I have stashed away for Gemma and me to enjoy in his absence).  

So I made Happy Cookies.

I’m pretty sure that’s not the technical term for these cuties, but growing up we always called them Happy Cookies, I think because they were dubbed that by my baby sister, and the name is just so apt.  So cute, so tasty, so small you can eat a few…it’s like getting a cookie AND a chocolatey treat and you can decide what order to eat them in or, if you’re the type that doesn’t separate your oreos, eat it all together…either way, HAPPINESS!  Literally forced down your throat!

Make your dough and roll the balls in sugar.

Cook ’em for 10 minutes then immediately grab the cutest helper you can find (sorry, this one’s taken) and put them to work!  

Top them with whatever floats your boat…we did caramel kisses and, since it’s Easter season and they make Gemma happy, mini eggs (kind of looks like nests right?), but they’re also great with chocolate rosebuds, peanut butter cups, chocolate chunks, etc.  Something with chocolate though, that’s imperative.

HAPPY COOKIES

1 3/4 cups flour

1 tsp baking powder

1/8 tsp baking soda

1/2 cup margarine, softened

1/2 cup peanut butter

1/2 cup granulated sugar (plus more for rolling balls in – mind, please exit gutter.)

1/2 cup brown sugar

1 egg

2 tbsp milk

1 tsp vanilla

About 50 chocolate kisses or other candies for centers (if using wrapped candy, unwrap while cookies cook and keep in the fridge between batches).

DIRECTIONS:

Preheat oven to 350.

In medium mixing bowl, mix flour, baking powder and soda and set aside.

In large mixing bowl, beat margarine and peanut butter on medium speed for 30 seconds, then add sugars and beat until light and fluffy.  Add egg, milk and vanilla and beat well.  Gradually beat in flour mixture until well combined.

Shape dough into 1″ balls, roll in sugar to coat and place on ungreased cookie sheet.  Bake at 350 for 10-12 minutes, until edges are firm and bottoms are lightly browned.  Remove pan from oven and immediately press kiss into center of each cookie (try not to burn your lips).  Remove and cool completely on racks.

Makes about 50 small, delicious cookies that freeze well.

Zucchini Bread

16 Apr

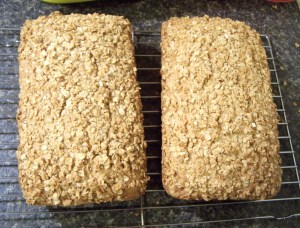
Well, since my love of zucchini is well-established, I’ll just get right to it.  This is delicious zucchini bread, and even more delicious if you add a crumble topping of approx. 1 tbsp melted butter, 1/2 cup oats and 1/3 cup brown sugar…adjust to your taste, but don’t make TOO much since it will just fall off when you de-pan the loaves anyway.

(This recipe makes 2 loaves)

ZUCCHINI BREAD

1 1/2 cups white flour

1 1/2 cups whole wheat flour

1 tsp baking powder

1 tsp baking soda

1 tsp salt

1 1/2 tsp cinnamon

1/2 tsp nutmeg (optional…nutmeg gives me the heebie jeebies.)

3 eggs

1 1/2 cups sugar

1 cup vegetable oil OR melted butter

2 tsp vanilla

2 cups shredded, unpeeled zucchini (or carrots, or a combination of the two)

1/2 cup walnuts and/or raisins (optional…raisins also give me the heebie jeebies.)

DIRECTIONS:

Preheat oven to 350 degrees.

Combine first 7 ingredients.  Beat eggs in large mixing bowl and gradually beat in sugar, then oil and vanilla.  Add dry ingredients, mixing well.  Stir in zucchini, nuts and raisins.

Divide batter over 2 greased 8.5×4.5″ loaf pans. Top with crumb topping if using, lightly pressing topping down into batter.  Bake for 55-60 minutes, until a toothpick inserted in the center comes out clean.  Cool in pans 10 minutes, then remove to rack to cool completely.

Freeze unneeded portions well-wrapped and unsliced to retain maximum freshness.


Teriyaki Beef on Lettuce & Quinoa

11 Mar

I love when I find recipes that are a little different from my usual and still delicious, and this definitely qualifies!

My sister and I have been exchanging meal plans for just over a year now and it has definitely resulted in a huge stack of new “regulars” in my cooking schedule.  One day when we were talking about how low we both were on cooking inspiration in our teeny tiny kitchens (I couldn’t even fit  a 9×13 pan in my apartment oven), we decided to give this a try and it is still going strong!  (Although I definitely owe you a meal plan, Smels. I’ll get on that).

This recipe is adapted from one sent by Chelsea, and the whole family loved it, minus the lettuce for the 2-year-old.  She always realizes after chewing several pieces of lettuce that this is not something she will able to swallow and if there’s one thing that ruins my pretty unflappable appetite it is watching chewed food make a reappearance on her plate.

I’ve been experimenting with quinoa (keen-wah) lately, it being the latest in an ever-changing line of “super-foods”, and I like it better than rice.  Having said that, I don’t think too highly of rice, the uglier cousin of the belle of the ball, pasta.  However, you can’t eat pasta EVERY night, so sometimes you have to have potatoes, or rice, or bread, or….QUINOA! (I don’t know who makes these lousy rules, but hey, rules are rules.)

But really, it’s a cute little ancient grain, a complete protein packed with iron and fiber and other good things, and it cooks exactly like rice does, at a 1:2 ratio of grain:water, with the addition of a little rinse before cooking to take away any bitterness.  This recipe can just as easily be made with rice (I know because the original recipe tried to talk me into rice), but it’s a delicious way to try out quinoa for the first time!

Unfortunately, I got halfway through my meal before I remembered to take a picture of the deliciousness, so I apologize for the half-eaten look, which , although realistic, does not capture the beauty of the dish when you bring it to the table, which is downright ooooh and aahhh worthy.

Teriyaki Beef on Lettuce & Quinoa (or rice)

Serves 4

1 cup uncooked quinoa (or rice), rinsed and drained (I use a sieve, since obviously it will fall right through a colander)

1 ½ lbs lean ground beef

1 ¾ cups water (2 cups if you like your rice or quinoa a bit softer/stickier)

1 ½ cups milk

½ cup thick teriyaki sauce

2 large carrots, shredded

1 clove garlic, minced or finely shredded

1 tbsp minced, peeled gingerroot, or 1 tsp dried ginger

2 green onions, sliced

2 tbsp fresh lemon juice

½ tsp ground black pepper

8 leaves romaine lettuce, or a bunch of shredded lettuce

Optional garnish: Toasted sliced almonds or toasted sesame seeds

DIRECTIONS:

Combine rice or quinoa with ½ tsp salt in a small saucepan.  Bring to a boil, reduce heat, cover and simmer for 15-17 minutes, until tender and water is absorbed.  Fluff with a fork.

Meanwhile, heat a large skillet over medium-high heat.  Add ground beef and brown, breaking up, until no pink remains, about 7 minutes.  Drain off any excess fat.  Stir in milk and teriyaki sauce and bring to a simmer, stirring frequently.  Stir in shredded carrots, garlic and ginger.

Reduce heat and simmer for 10 minutes, until sauce is slightly thickened.  Stir in green onions, lemon juice and pepper.

Place lettuce leaves on serving plates, 2 per person, and top with quinoa/rice and beef mixture.  Alternatively, pile chopped or shredded lettuce on a large serving platter and top with quinoa and beef mixture.

If desired, garnish with sliced almonds or sesame seeds for a bit of crunch.